88-91 Honda CRX clutch replacement
Note - This page is meant as a guide only, do not assume that everything here is absolutly correct. If you discover any mistakes or improvments let me know by clicking here.
|

Remove the large nut from the end of each axel, this is best done while the car is on the ground so that the wheel doesn't just spin.
Jack up the car and and support it on both sides using jackstands.
Remove the front wheels.
Remove the platic covers from below the engine.
Drain the fluid out of the tranny. Its a good idea to place one of your new quarts of lube in the drivers seat so that you don't forget to refill it.
Remove the nut and cotter pin from the lower ball joint, its just below the brake disk.
Pull the hub assembly up so that the ball joint is removed from the lower control arm. "that almost sounds easy, actually you'll need to hammer, pry, curse, beg your god for help to make this happen." Or you could probally just use a ball joint seperator tool.
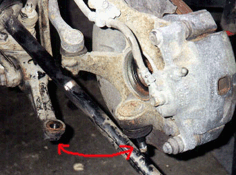 |
Hub Assembly The red arrow indicates the lower ball joint and where it attaches to the lower control arm. The long diagonal bar in the picture is the halfshaft which has already been removed from the hub and pulled as far away from the tranny as possible. |
With the ball joint removed you can now pull the hub assembly outward and pop the axel shaft out of it. Sometimes the shaft may stick and will require some cursing and help from god.
From under the car use a large screwdriver or prybar to pop the other end of the axelshaft out of the tranny. Pull the axelshaft as far away from the tranny as it will go, it will not fit all the way out through the suspension though.
Take a break and drink a cold beer, I recommend a Canadian brew.
Disconnect the battery connections and remove the battery and its metal tray from the car.
Disconnect the clutch cable from the tranny, spin the adjuster all the way upwards and you'll be able to free the cable.
Disconect the speedometer cable from the tranny. There is a small clip near the base of it, once removed the cable will pull out. Do not remove the bolt that looks like it holds it together, this could result in the speedo gear falling into the tranny.
Disconnect all wires and sensors that are attached it the tranny.
Disconnect the shifter linkage from the back of the tranny. There are 2 rods, one is unbolted from the tranny and the other is unbolted from the shifter.
Place your trusty floor jack under the engines oil pan and raise it till it just touches the pan. Use a piece of wood to cushion it.
Remove the inpection cover from the bottom of the tranny, its that sheet metal piece between the motor and the tranny.
Remove the front motor mount, the bolt that holds it to the crossmember and the two bolts that fasten it to the tranny.
You'll probally need to remove the cooling fan to gain access to some of this stuff.
Remove the 3 bolts that attach the rear mount to the tranny.
Remove the left side tranny mount.
Unbolt the starter and use a bungy cord to hold it up out of the way some.
Remove the bolts that hold the tranny to the engine.
Carefully lower the floor jack down some so that the engine and tranny are tilted.
You'll need the help of a friend now. Have one person above the tranny and the other under the car. Pull the tranny away from the engine untill the input shaft pulls out of the clutch assembly. You must hold the tranny up since it is only being supported by the input shaft during this. Manuver the tranny down and out the bottom of the car.
Take another break and have another Canadian beer. I recommend Labatts Maximum Ice.
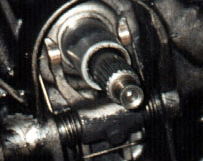
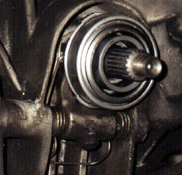
Remove the throwout bearing from the tranny and replace it with a new one. Place a very small amount of grease on the input shaft where the bearing will slide. It is held in with 2 spring clips. Make sure that when you attach the new one that the ends of the clips go completly into the opening on the bearing.
Input shaft with and without the input shaft bearing removed
|
- Unbolt the pressure plate from the flywheeland remove it and the clutch. Avoid breathing any of the dust around this area, it often contains asbestos.
|
- Inspect the Flywheel for signs of wear. If it appears grooved or "messed up" take it to a local machine shop to be resurfaced.
- Many people replace the pressure plate when doing a clutch. If you are not planning on doing this then inspect the fingers and mating surface for signs of wear.
- Check the pilot bearing in the center of the flywheel, if it does not spin freely then replace it. Most people just replace it automatically since it only costs a few dollars and you'll need to pull the tranny out again if it goes bad.
- Take another break. Skip the beer this time.
- If you removed the flywheel then bolt it back up to the engine now.
- Place your clutch alignment tool through your new clutch disc and insert the tip into the pilot bearing. Put the pressure plate back on and bolt it up to the flywheel making sure that the clutch alignment tool stays lined up with the pilot bearing and is sticking straight out. Tighten the bolts in a criss cross pattern a little at a time to avoid warping the pressure plate.
- Remove the alignment tool and slide the tranny back under the car.
- Lift the tranny back up and slide it onto the engine. This will take a little work to get the input bearing to slide into the clutch and smoothly. You must hold the tranny straight during this or you can damage the input shaft. If the tranny will not go onto the engine then the clutch is probally not aligned perfectly. Loosen the pressure plate and realign the clutch disc.
- Bolt the tranny back up to the engine
- Take a long break. Go sit out in the backyard and have a beer while staring at the sky.
- Reassemble everything in the reverse order that you took it apart. Good luck!
Torque Specs
These are for the 88-91 CRX, I would assume that these are the same for the 88-91 Civic as well.
| Clutch pressure plate bolts | 19 ft-lbs |
| Release firk bolt | 22 ft-lbs |
| Driveaxle/hub nut | 134 ft-lbs |
| Transaxle to engine bolts | 4 speed 33 ft-lbs / 5 speed 50 ft-lbs |